![[nodets] Librarytype](/_next/image?url=%2Fimages%2Fempty.png&w=2048&q=75)
0
목차
node + typescript 적용하기 (typescript 적용하기)
타입 없는 라이브러리 타이핑 적용
🟢 axios ts 라이브러리 만들기
node + typescript 적용하기 (typescript 적용하기)
2023년 9월 12일타입 없는 라이브러리 타이핑 적용
Redux.js 따라서 만들기
📍 js 라이브러리에 type 이 지정되어 있는경우는 두가지 경우로 볼수있다.
- javascript 라이브러리에 따로 typescript를 붙이는 방법
- 아예 typescript 로 타이핑 -> Redux 처럼
- 우선 passport-local의 type 을 지워준다.
yarn remove @types/passport-local
- types/express 경로에 passport.local.d.ts 파일을 만든후 다음을 적용(실제로 쓰는 정도에서만 타이핑 해주는것이 좋다.) - declare module "passport-local"로 감싸 ambient 모듈로 만들어줌
declare module "passport-local" {
  // toplevel 이어야 함
  import { Strategy as PassportStrategy } from "passport"; // 안쪽에 import 시켜줘야함
  export interface IVerifyOptions {
    [key: string]: string;
  }

  export interface IStrategyOptions {
    usernameFiled: string;
    passwordFiled: string;
  }
  // 여기서는 상대 경로로 import 해올수 없음
  export interface Done {
    // 앞에 인자가 optional 인경우 뒤에 인자가 required 일수 없음
    (error: Error | any, user?: any, options?: IVerifyOptions): void;
  }
  export interface VerifyFunction {
    (username: string, password: string, done: Done): void | Promise<any>;
  }
  export class Strategy extends PassportStrategy {
    constructor(options: IStrategyOptions, verify: VerifyFunction);
  }
}
- 다음과 같은 타입 말고도 다른 인자값이 필요한 경우 오버로딩을 통한 타입확장을 진행해주어도 좋다.
🚩 declare 는 언제 사용할까 ?
-
전역으로 타입 사용시(모듈안에 있을시에는 굳이 declare 할 필요 x)
-
만약 open source 에 공유하고 싶다면 다음과 같이 겉에 감쌌던 declare module 을 없애고 사용할 'Strategy' 만 declare 시켜준다.
import { Strategy as PassportStrategy } from "passport";
export interface IVerifyOptions {
  [key: string]: string;
}

export interface IStrategyOptions {
  usernameFiled: string;
  passwordFiled: string;
}
export interface Done {
  (error: Error | any, user?: any, options?: IVerifyOptions): void;
}
export interface VerifyFunction {
  (username: string, password: string, done: Done): void | Promise<any>;
}
declare class Strategy extends PassportStrategy {
  constructor(options: IStrategyOptions, verify: VerifyFunction);
}
🟢 axios ts 라이브러리 만들기
- axios ts 라이브러리 세팅
-
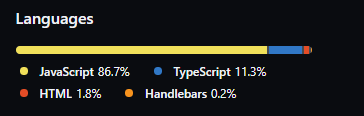
axios 사이트에 가보면
-
javascript 로 만든후 index.d.ts로 타입을 따로 지정해준것을 볼수 있다.(javascript로 만든후 따로 타입을 지정)
📍 typescript 로 만들어 보기
- axios 폴더를 하나 만들어 pakages.json을 만들어줌
yarn init
- typescript를 설치해준다
yarn add typescript
- tsconfig.json 파일을 추가
{
  "declaration": true, // 이게 있어야 d.ts 파일이 생김(ts파일 실행시 js로 실행되면서 d.ts 파일이 생성됨)
  "types": "./index.d.ts"
}
🚩 타입 생성후 배포시 convention 이나 그밖의 룰 참고
** common mistakes 읽어보기
- index.ts 파일 생성후 tsconfig 에 추가해줌
{
  "lib": ["dom", "es2020"]
}
✔ 만들것들
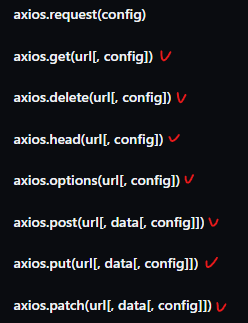
🚩 fetch 와 axios 중에 무엇이 좋은가
fetch 미래, axios는 중간다리
- internet explore 이 있는한 axios의 호환성을 무시할수 없다...
- xhr로 구현하기
❓ XMLHttpRequest(XHR) 이 무엇?
XMLHttp요청/ XMLHttpRequest(XHR) 개체는 서버와 상호작용하는데 사용됨. 전체 페이지를 새로 고치지 않고도 URL에서 데이터를 검색할 수 있음(데이터 일부만 업데이트 가능)
주로 XMLHttpRequestAJAX 프로그래밍 에서 많이 사용
브라우저에서만 돌아감 node에 없는 개체
** 참고사항
- 1 과 2 는 같은 것임
// 1. onload event 사용시
xhr.onload = function () {
  if (xhr.status >= 200 && xhr.status < 300) {
  } else {
  }
};

// 2. onreadystatechange event 사용시
xhr.onreadystatechange = function () {
  if (xhr.readyState === xhr.DONE) {
    if (xhr.status >= 200 && xhr.status < 300) {
    } else {
    }
  }
};
- type guard 실전 적용
const axios: Axios = {
  put(url, data, config) {
    return new Promise<AxiosResult>((resolve, reject) => {
      const xhr = new XMLHttpRequest();
      xhr.onload = function () {
        if (xhr.status >= 200 && xhr.status < 300) {
          resolve({ data: xhr.responseText });
        } else {
          reject({ data: xhr.responseText });
        }
      };
      xhr.onerror = function () {
        reject({ data: xhr.responseText });
      };
      xhr.open("PUT", url);
      // 다음과 같은 상황
      if (isAxiosData(data)) {
        xhr.send(JSON.stringify(data));
      } else {
        xhr.send(data);
      }
    });
  },
};
- 다음과 같은 상황에서 obj 이지만 null 이랑 form data가 아닌애들을 판별해야할시
function isAxiosData(data: any): data is AxiosData {
  if (data !== null) return false;
  if (data instanceof FormData) return false;
  return typeof data === "object";
}