![[git] GithubAction](/_next/image?url=%2Fimages%2Fempty.png&w=2048&q=75)
github Actions
github Actions 기본 5가지
github Actions 을 사용하여 자기 repo에 md 파일 생성하기
github Actions 을 사용하여 다른 repo에 md 파일 생성하기
githubAction 사용하여 다른 repository 와 md 파일 동기화 시키기
hongyelim repo에 있는 md 파일과 firebase 에 있는 data 객체 동기화 과정
동기화 과정(총 정리)
github Actions
2023년 9월 12일github Actions 기본 5가지
- Event
- main branch 로 merge 하거나 commit 을 push, issue를 누군가가 열때 그때 수행해야 하는 일들을 처리
- Workflows
- Jobs
- Actions
- Runners
github Actions 을 사용하여 자기 repo에 md 파일 생성하기
name: Create MD File

on:
  push:
    branches:
      - main # Change this to the branch where you want to trigger the action

jobs:
  create-md:
    runs-on: ubuntu-latest
    steps:
      - name: Checkout code
        uses: actions/checkout@v2

      - name: Create MD File
        run: |
          echo "# My New Markdown File" > new-file.md
        working-directory: ./ # 최상위 디렉터리로 설정

      - name: Commit and Push
        run: |
          git config --global user.name "AwesomeYelim"
          git config --global user.email "uiop01900@gmail.com"
          git add .
          git commit -m "Create new Markdown file"
          git push
github Actions 을 사용하여 다른 repo에 md 파일 생성하기
- 우선적으로는 토큰을 하나 생성해준다
- 접근할 repo에 가서 Workflow permissions 을 다음과 같이 read and write 로 바꿔준다.!
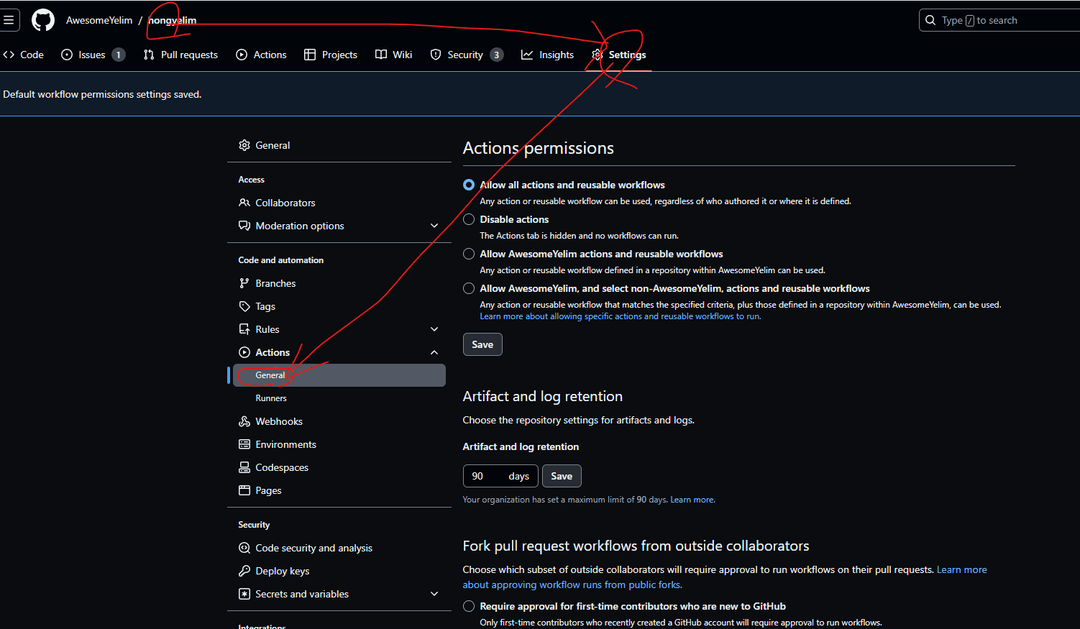
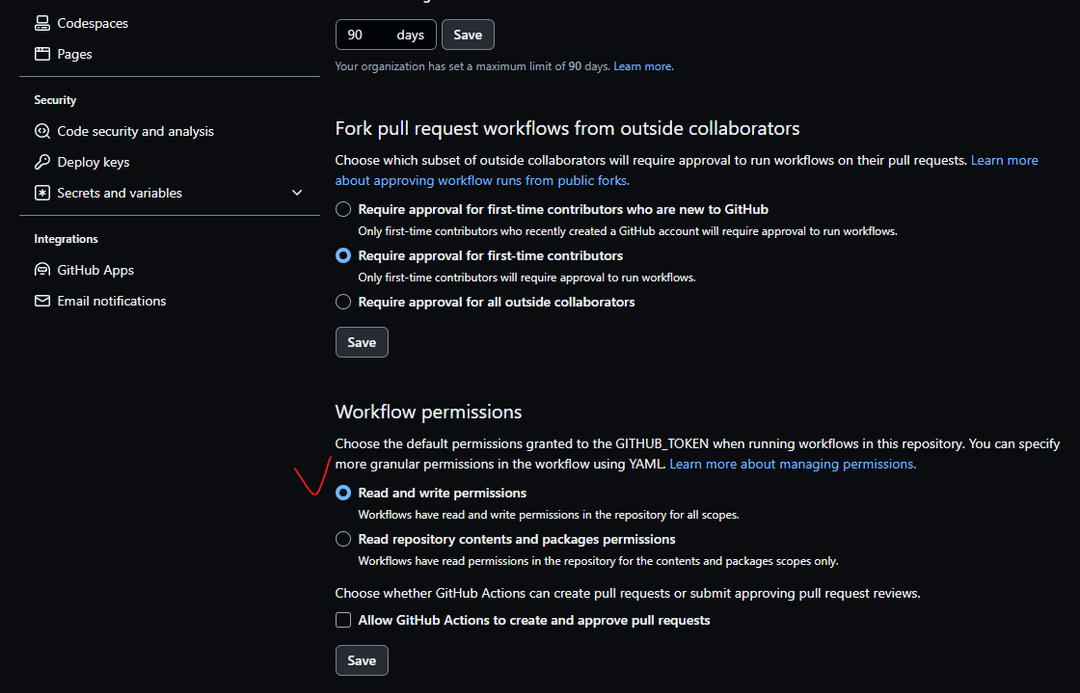
name: Create MD File

on:
  push:
    branches: [main]
    pull_request:
      branches: [main]
jobs:
  create-md:
    runs-on: ubuntu-latest

    steps:
      - name: Checkout code
        uses: actions/checkout@v2
        with:
          persist-credentials: false
          fetch-depth: 0

      - name: Create MD File
        run: |
          echo "# My New Markdown File" > new-file.md
        working-directory: ./

      - name: Set up Git credentials
        run: |
          git config --global user.email "uiop01900@gmail.com"
          git config --global user.name "AwesomeYelim"
          git config --global credential.helper "store --file=.git-credentials"
          echo "https://github.com:${{ secrets.MDFILEINTERLOCK  }}" > .git-credentials
        env:
          API_TOKEN_GITHUB: ${{ secrets.MDFILEINTERLOCK  }}

      - name: Commit and Push
        id: push_directory
        uses: cpina/github-action-push-to-another-repository@main
        env:
          API_TOKEN_GITHUB: ${{ secrets.MDFILEINTERLOCK  }}
        with:
          source-directory: "."
          destination-github-username: "AwesomeYelim"
          destination-repository-name: "push할 repository 이름"
          commit-message: "test"
          target-branch: main
          target-directory: "생성할 테스트 파일"
githubAction 사용하여 다른 repository 와 md 파일 동기화 시키기
- 최상단 루트에 다음 builde.sh 파일을 생성해준다.
mkdir output
cp -R ./Basic/* ./output
cp -R ./output ./Basic
- workflow.yml 파일에 가서 다음과 같이 입력
name: MD File Interlock

on:
  push:
    branches: [main]
    pull_request:
      branches: [main]
jobs:
  create-md:
    runs-on: ubuntu-latest

    steps:
      - name: Checkout code
        uses: actions/checkout@v2
        with:
          persist-credentials: false
          fetch-depth: 0

      - name: creates output
        run: sh ./build.sh

      - name: Commit and Push
        id: push_directory
        uses: cpina/github-action-push-to-another-repository@main
        env:
          API_TOKEN_GITHUB: ${{ secrets.MDFILEINTERLOCK  }}
        with:
          source-directory: "output"
          destination-github-username: "AwesomeYelim"
          destination-repository-name: "AwesomeYelim"
          commit-message: "test"
          target-branch: main
          target-directory: "yelimtest"
참고
 https://vanilla-van-6e4.notion.site/vercel-47312c7c2a9c492dbdabc40c47489cfa

 https://velog.io/@rmaomina/github-actions-file-sync#%EC%84%B1%EA%B3%B5
++ 나는
b_로 시작되는 파일들로 블로그에 올릴 글들을 구별해 놓고, 터미널 명령어로 끝의 글자들을 따서 rename 해주었음
mkdir output # 최상위 root에 output 이라는 파일을 만들겠다.

# 디렉토리까지 복사
# find ./* -name *.md | cpio -pdm output # 디렉토리까지 복사


# 파일 그대로 복사
# find ./* -type f -name "b_*.md" ! -path "*/node_modules/*" -exec cp {} output \;


# 'b_' 이부분만 삭제해줌
# find ./* -type f -name "b_*.md" ! -path "*/node_modules/*" -exec sh -c 'cp "$1" "output/$(basename "$1" | sed "s/b_//")"' _ {} \;

# 'b_' 이부분만 삭제 및 '_'기준으로 split 해준 배열의 마지막 요소 값 사용
find ./* -type f -name "b_*.md" ! -path "*/node_modules/*" -exec sh -c 'cp "$1" "output/$(basename "$1" | awk -F_ "{print \$NF}")"' _ {} \; # '_'기준으로 split 한뒤 마지막 요소값만 사용


# 만약 indexing 값이 필요하다면 이것을 사용
# index=1
# find ./* -type f -name "b_*.md" ! -path "*/node_modules/*" -print | while read -r file; do
#     cp "$file" "output/${index}_$(basename "$file" | awk -F_ "{print \$NF}")"
#     index=$((index+1))
# done
hongyelim repo에 있는 md 파일과 firebase 에 있는 data 객체 동기화 과정
-
우선 test script를 만들어서 hongyelim 내부에서 실행 시켜보자
-
그 다음 study를 push 할때마다 트리거 가능한 파일을 hongyelim 내부에 생성한다.
-
[hongyelimrepo].github/workflow/test_action.yml 파일 생성 => src/app/dataInterlock.ts 경로의 ts 파일을 실행하려고 함 -
dataInterlock.ts 파일 생성
// src/app/dataInterlock.ts

import { db } from "./firebase";
import { doc, getDocs, setDoc, collection } from "firebase/firestore";
import { Post } from "@/service/posts";
import fs from "fs";
import path from "path";

async function dataInterlock() {
  const fireposts = await getDocs(collection(db, "posts"));

  let posts: Post[] = [];

  /** firebase 에 있는 data 배열 */
  fireposts.forEach((doc) => {
    posts.push(doc.data() as Post);
  });

  /** firebase 에 있는 data 배열의 titles */
  const postTitles = posts.map((el) => el.title);

  /** md 폴더에 있는 md file list */
  const existingMd = fs.readdirSync(path.join(process.cwd(), "data", "md")).map((el) => el.split(".")[0]);

  /** md file list 기준으로 firebase 에 없는 title 구분  */
  const differTargets = existingMd.filter((mdTitle) => !postTitles.includes(mdTitle));

  if (differTargets.length) {
    differTargets.forEach(async (title) => {
      const postData = doc(db, "posts", title);
      const mdPath = path.join(process.cwd(), "data", "md", `${title}.md`);

      let mdFile: Buffer | string;
      mdFile = fs.readFileSync(mdPath);
      mdFile = mdFile.toString();

      const splitTitles = title.split(/(?<=[a-z])(?=[A-Z])/);

      const restLetter = splitTitles.shift();

      await setDoc(postData, {
        id: posts.length + 1,
        title,
        content: mdFile.match(/#+\s(.+)/g)?.[0] || "", // mdfile contents 의 시작글
        post_title: `[${restLetter}]${[...splitTitles].join("")}` || "",
        heart: {},
        heart_count: 0,
        created_at: Math.floor(new Date().getTime() / 1000),
        tag: splitTitles || [], // camelcase 중간대문자 기준으로 tag 생성
        comments: [],
      });
    });
  }
  return;
}

dataInterlock();
[hongyelimrepo].github/workflow/test_action.yml 파일 생성
name: Execute data interlock

on:
  workflow_dispatch:
    inputs:
      logLevel:
        description: "Log level"
        required: false
        default: "warning"
        type: choice
        options:
          - info
          - warning
          - debug
      tags:
        description: "Test scenario tags"
        required: false
        type: boolean
      environment:
        description: "Environment to run tests against"
        type: environment
        required: false
  repository_dispatch:
    types: [run-test-script]

jobs:
  run-script:
    runs-on: ubuntu-latest

    steps:
      - name: Checkout code
        uses: actions/checkout@v2

      - name: Install TypeScript
        run: yarn add typescript --dev

      - name: Install ts-node
        run: yarn global add ts-node

      - name: Run Test Script
        run: $(yarn global bin)/ts-node src/app/dataInterlock.ts
[Studyrepo]yml 파일에 다음을 추가
name: Create MD File

on:
  push:
    branches: [main]
  pull_request:
    branches: [main]

  repository_dispatch: # Add this section
    types: [run-test-script] # Specify the custom event type

jobs:
  create-md:
    runs-on: ubuntu-latest

    steps:
      - name: Checkout code
        uses: actions/checkout@v2
        with:
          persist-credentials: false
          fetch-depth: 0

      - name: creates output
        run: sh ./build.sh

      - name: Commit and Push
        id: push_directory
        uses: cpina/github-action-push-to-another-repository@main
        env:
          API_TOKEN_GITHUB: ${{ secrets.MDFILEINTERLOCK  }}
        with:
          source-directory: "output"
          destination-github-username: "AwesomeYelim"
          destination-repository-name: "hongyelim"
          commit-message: "mdFileInterlocked📚"
          target-branch: main
          target-directory: "data/md"

      - name: Trigger "hongyelim" Workflow
        run: |
          curl -X POST \
            -H "Authorization: token ${{ secrets.MDFILEINTERLOCK }}" \
            -H "Accept: application/vnd.github.v3+json" \
            -d '{"ref": "main"}' \
            https://api.github.com/repos/AwesomeYelim/hongyelim/actions/workflows/data_interlock.yml/dispatches
        env:
          API_TOKEN_GITHUB: ${{ secrets.MDFILEINTERLOCK }}
동기화 과정(총 정리)
요약 )
Studyrepository mdfile <=>hongyelimrepository mdfile <=>firebasedata object
-
Studyrepository 에서 md 파일을 수정 -
Study에 있는 (github Action) workflow.yml 실행 process-
[creates output]build.sh 파일 실행 : output 파일 생성 -> 디렉토리 내의b_로 시작되는 파일들을_기준 split 한 마지막 요소 이름으로 복사 -
[Commit and Push]hongyelimrepository 에 접근 및mainbranch 에 있는data/md디렉토리에output폴더 내부 파일들을 push (md file 동기화🌟) -
[Trigger "hongyelim" Workflow]hongyelimrepository 에 접근 및 내부 action 파일(data_interlock.yml)을 실행해줌
-
-
hongyelim에 있는 (github Action) data_interlock.yml 실행 process
-
workflow_dispatch에서[Trigger "hongyelim" Workflow]action을 받음 -
run-script내의steps들을 진행한다.( githubaction 환경이라는 점을 기억하자..)-
[Install TypeScript]에서 TypeScript 설치 -
[Install ts-node]ts-node 설치 -
[Run Test Script]githubaction 환경에서 dataInterlock.ts를 실행 시키기 위해서는 yarn 에 global 변수 선언을 해주어야함
$(yarn global bin)/ts-node src/app/dataInterlock.ts -
-
dataInterlock.ts진행 process- (생성된 md files 기준)
firebase의 data 객체 키가 없다면 비교하여 자동 생성 해준다(위의 script 참조) (md file 기준 data 객체 동기화🌟)
- (생성된 md files 기준)